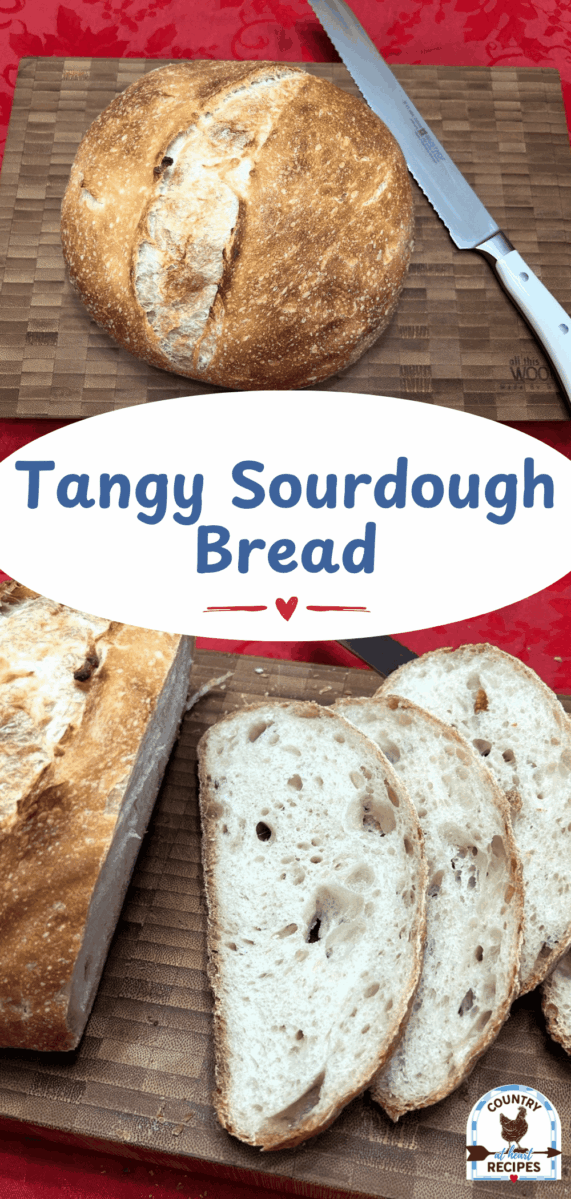

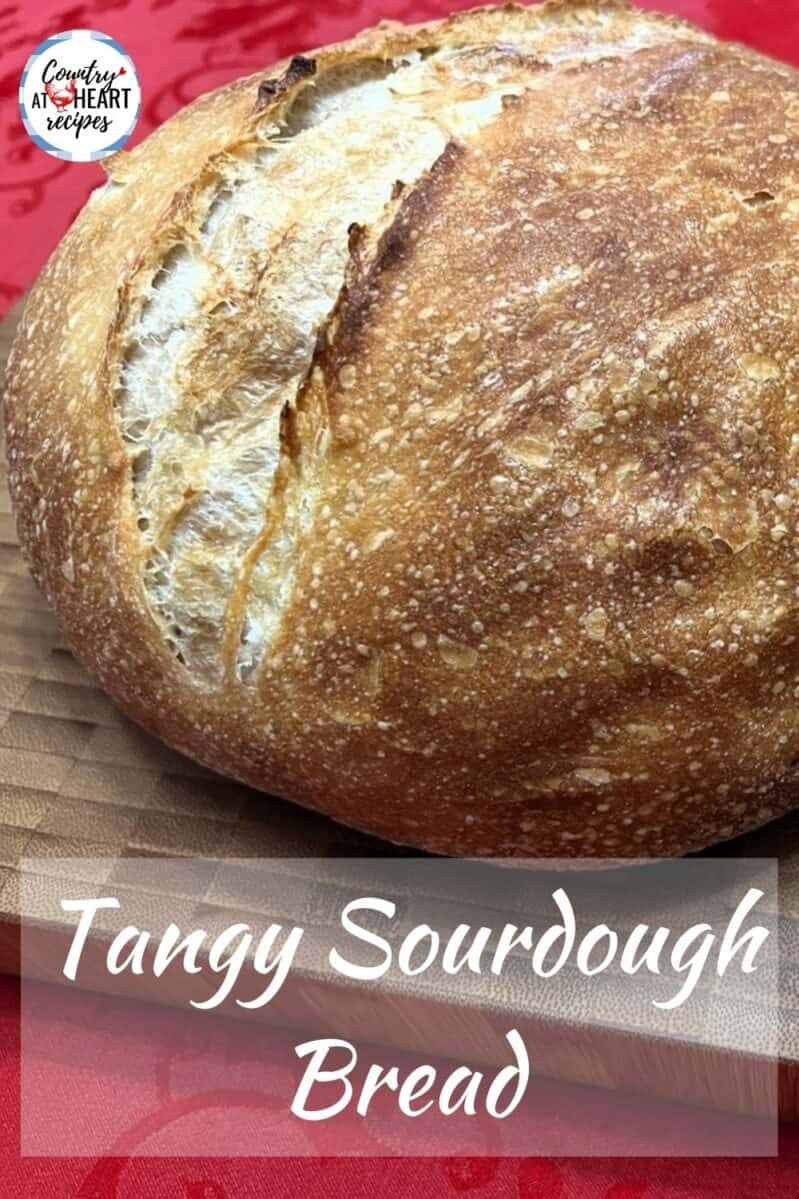


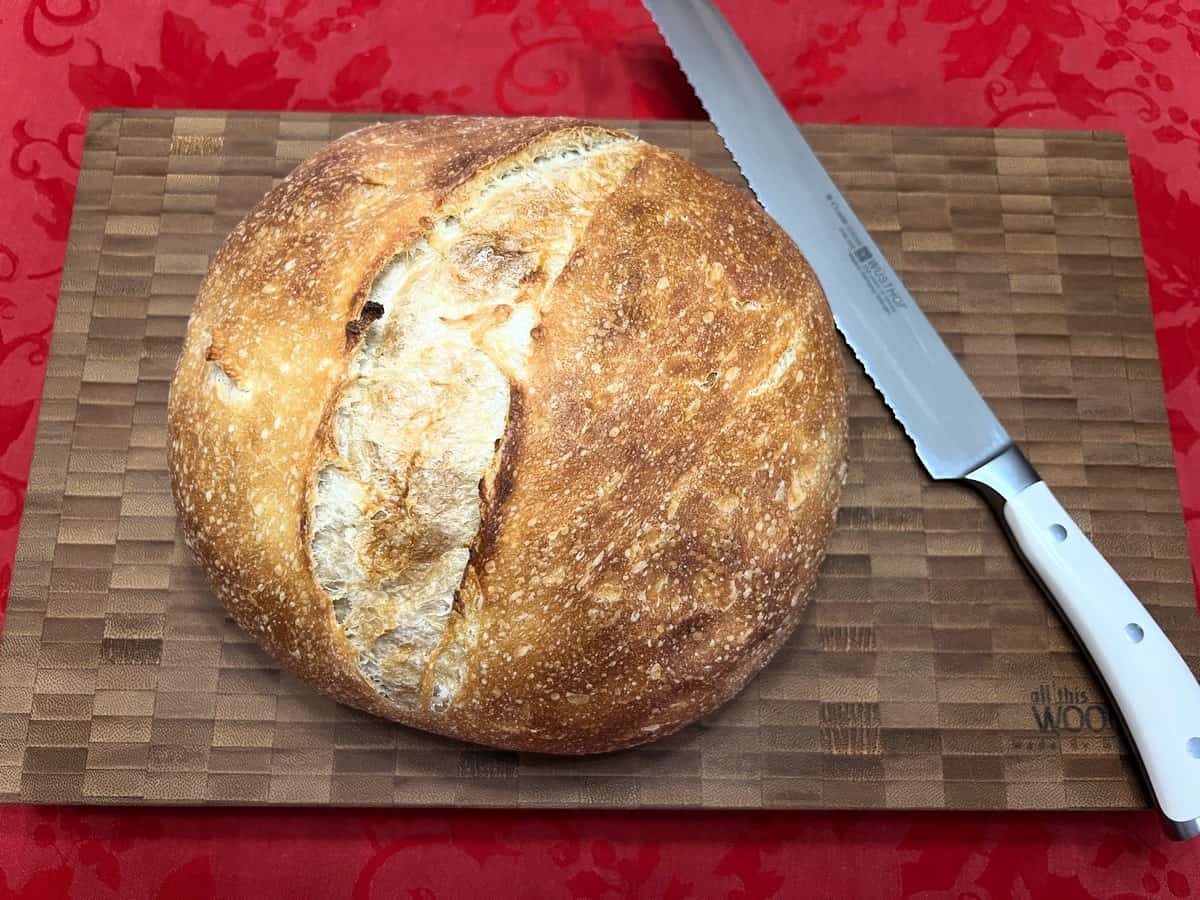
This recipe for Tangy Sourdough Bread is what comes to mind when you think of sourdough. Like San Francisco sourdough. It is the quintessential example of sourdough bread. Crispy golden crust with a bit of chewiness. Moist and tender open crumb, and a delectable tanginess that comes only from aged fermentation.
We love this Tangy Sourdough Bread and make it every week! It makes two loaves, so I’ll either freeze one for later in the week, take it to our weekly potluck at church, or give a loaf to family or friends.
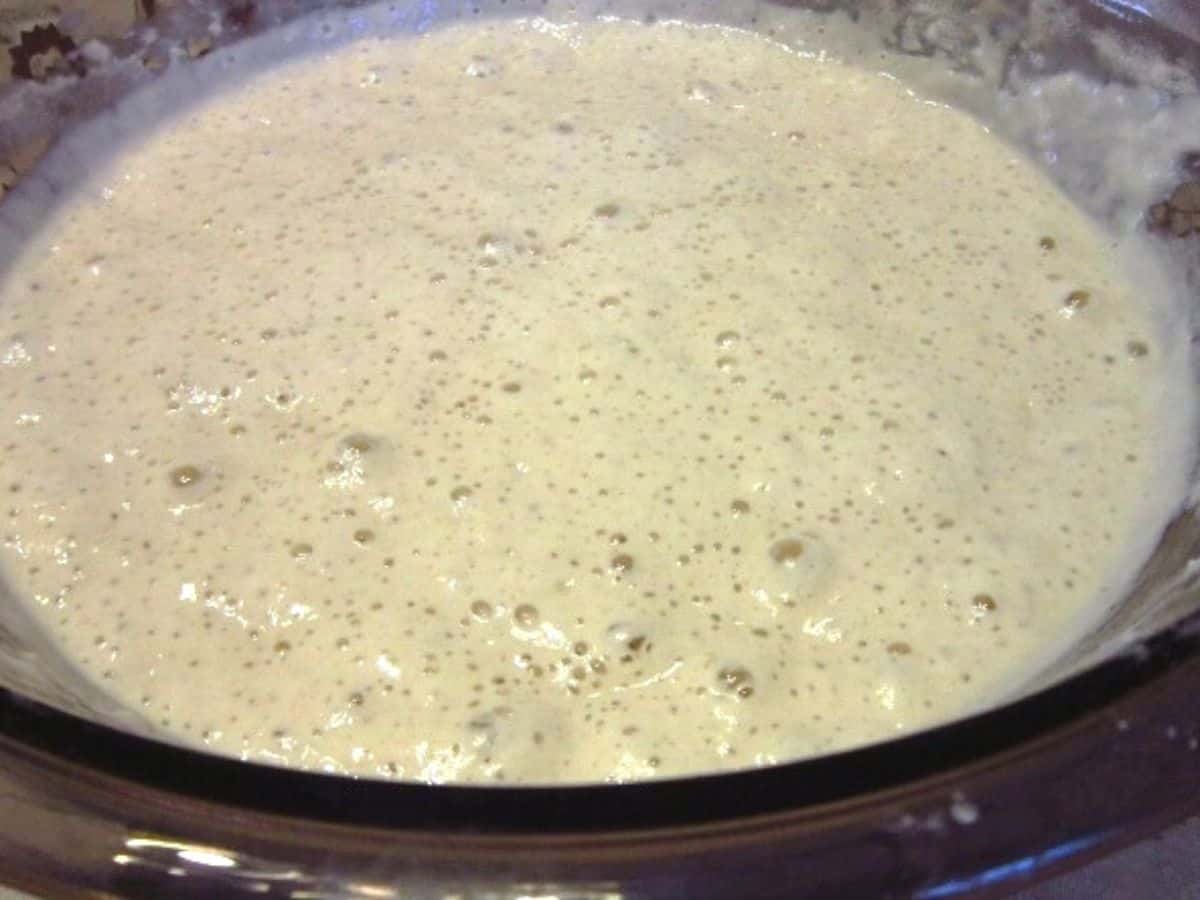
There is much to know about working with sourdough, so I’ll try to share a few things about making this particular recipe. The first is to use sourdough starter that has been “fed”. Which means, you’ve fed your starter flour and water, it has set for a few hours, and is now bubbly.
This recipe has a two-day process, but when I’ve been in a hurry, I’ve actually skipped refrigerating the dough overnight. It still turned out good. It just wasn’t as tangy in flavor.
The next thing to know, is that this dough will likely be very sticky. And that’s okay. That’s how it is supposed to be. Using a stainless bench scraper helps lift the sticky dough from the work surface. It’s important to work the dough during it’s “rising stage” to help it develop its gluten. Once that happens, the dough will be less sticky and will become a more stable, soft dough.
The Old Way – My Beginning Attempts
When I first began making my sourdough bread, I placed the dough on parchment paper that had been sprayed with cooking spray. Then once it was ready for baking, I scored it with a knife, and using a pizza peel, placed it in a 425°F oven on a baking stone. This worked really well, and I was happy with my bread for many years. (I have had my sourdough starter, which I named Bertha, since June 2013.)
This year, I wanted to take things to a new level, to achieve a bread like what you would purchase from a professional bakery.
Recommended Tools
Below you’ll find some of my favorite bread baking tools that I’ve collected through the years. Although not completely necessary, the tools will help increase your skills and enjoyment in baking bread.
As an amazon associate, i earn from qualified purchases at no price increase for you.

Bread Banneton Proofing Basket
Buy Now → Buy Now →
  Buy Now →
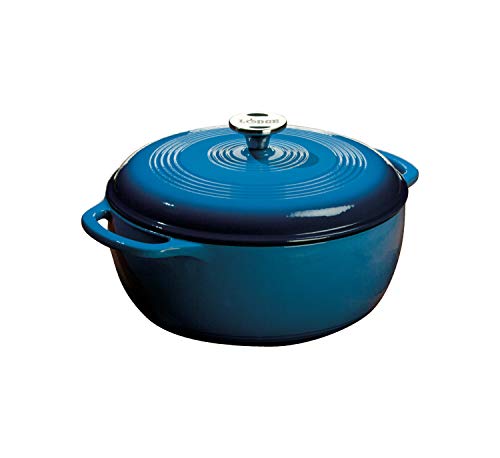
Lodge 6 Quart Enameled Cast Iron Dutch Oven
Buy Now → Buy Now →
  Buy Now →
 Ingredients for Tangy Sourdough Bread
(As a Walmart Affiliate, I earn from qualified purchases at the links below. See the full recipe at the bottom of this post.)
What Home Cooks Are Saying About This Recipe
Instructions for Making this Recipe
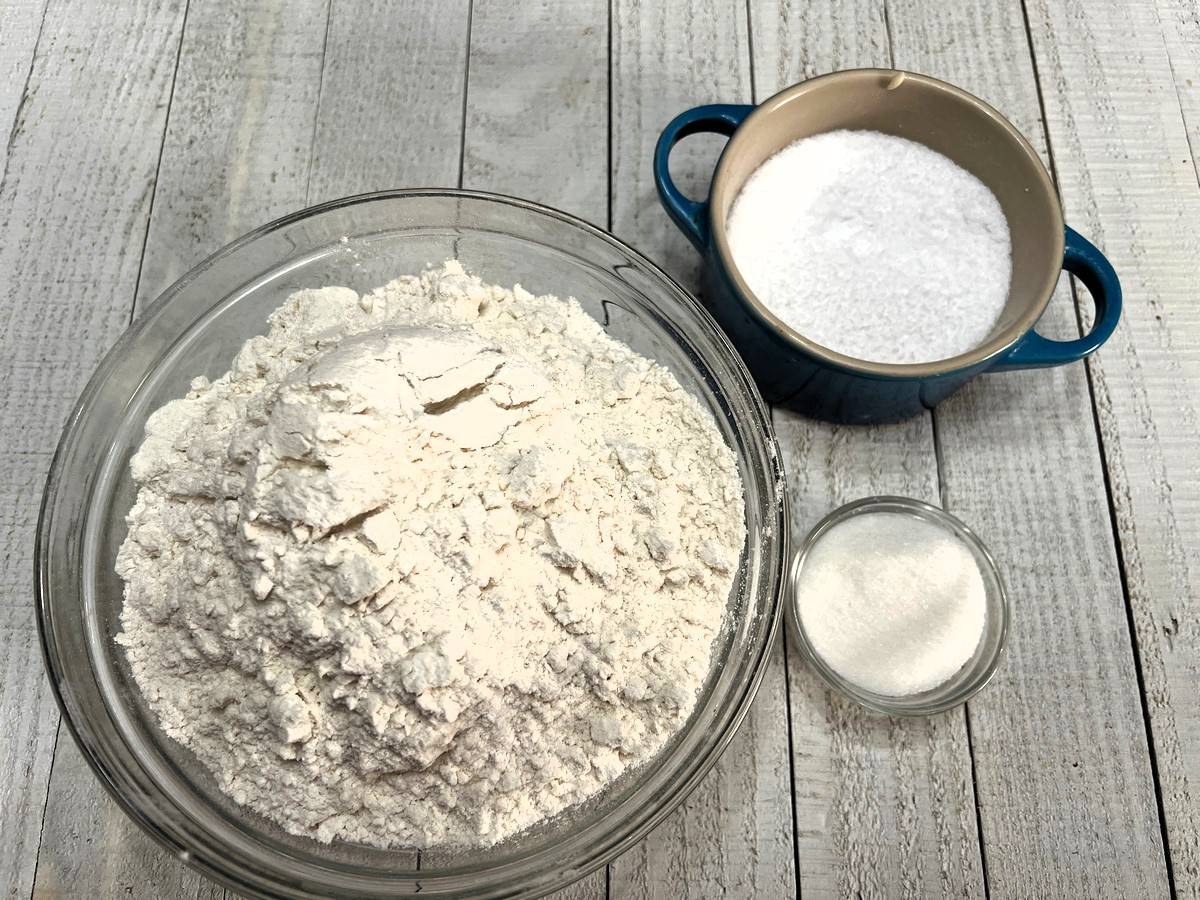
Gather the ingredients so you have everything close at hand on the counter or table. For this recipe you only need five simple ingredients: Sourdough starter, all-purpose flour, granulated sugar, kosher salt, and water. I also use brown rice flour when dusting the loaves.
Prepare the Levain (Leaven Starter)
In a large mixing bowl, combine the “fed” starter, warm water, and 3 cups of all-purpose flour. Stir vigorously with wooden spoon for 1 minute. Cover with plastic wrap and let rest at room temperature for an hour. Refrigerate overnight.
Mix the Bread Dough
The next day, remove the levain from the refrigerator and allow it to come to room temperature, about an hour.
In a large mixing bowl, with kneading hook attachment, combine the levain with the remaining 2 cups all-purpose flour, granulated sugar, and kosher salt. Begin mixing at a low speed, adding up to 1/4 cup of water as needed to make a smooth dough. Continue kneading for 5-7 minutes.
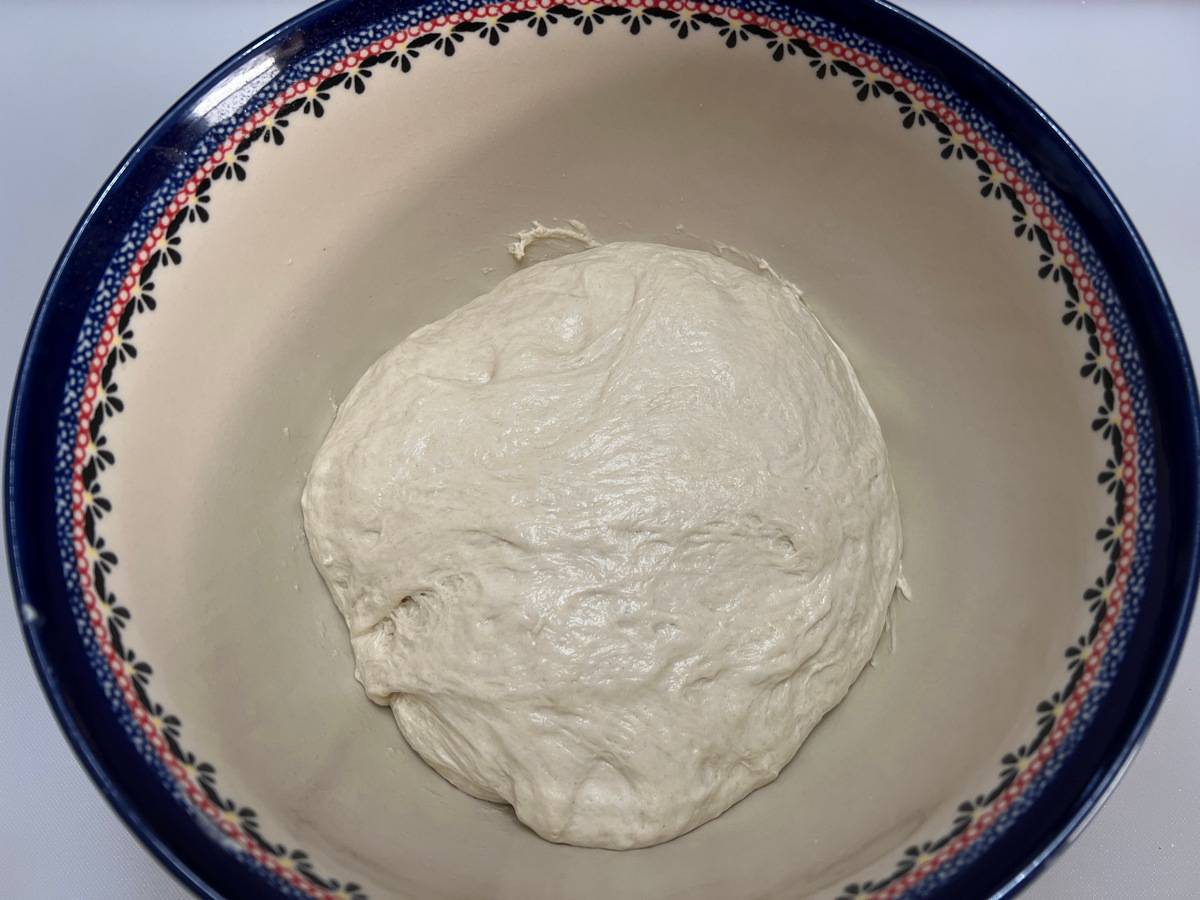
Transfer the dough to a large greased bowl and cover with plastic wrap. Allow the dough to rise until it has doubled. (This may take 2-3 hours).
Because I stopped adding yeast to my recipe, the dough now needs to be worked during the rising time to help develop its natural gluten. Remove the dough at each hour interval to stretch and fold the dough on a smooth surface, envelope-style to work the gluten in the dough. The dough will most likely be sticky, but refrain from using flour. Instead, use a stainless bench scraper to lift the dough from the work space.
Form Dough into Loaves
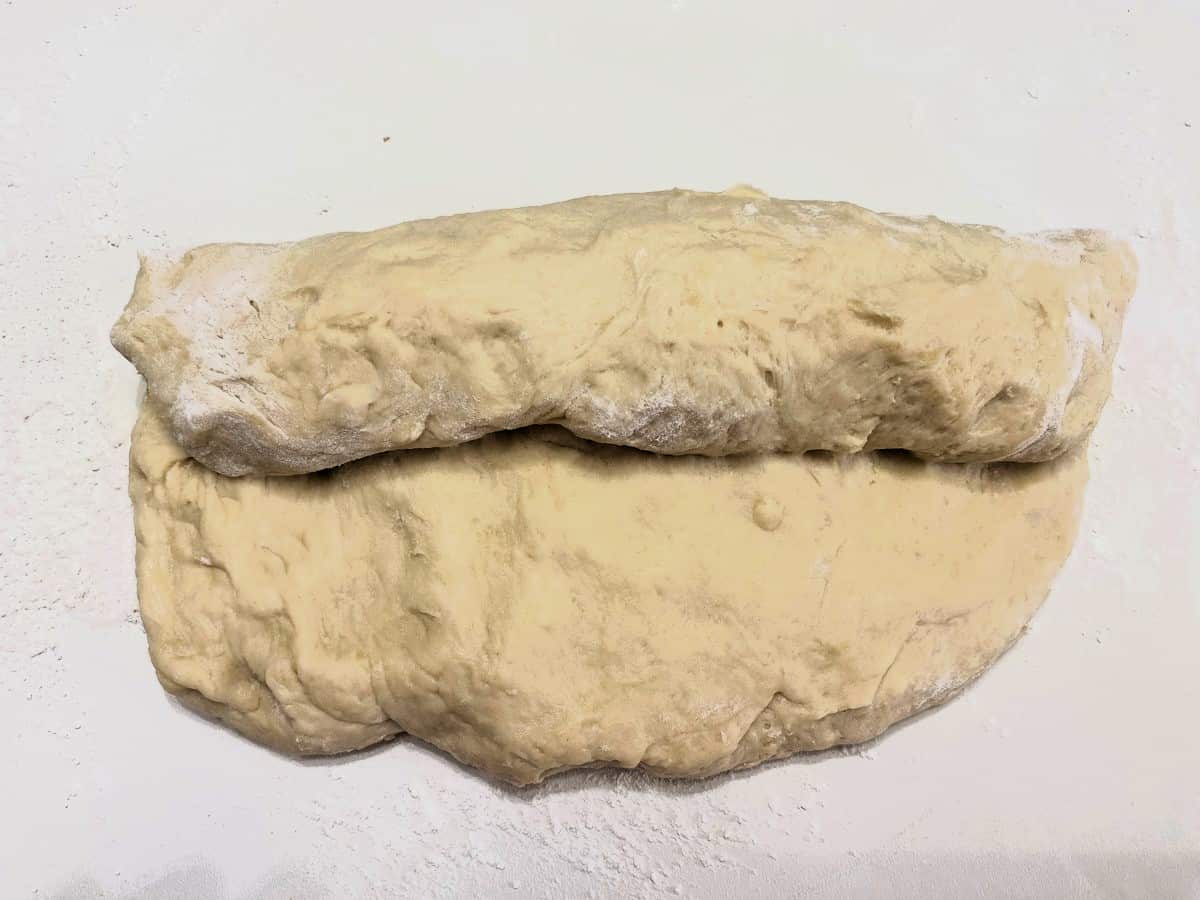
Once the dough has doubled, divide the dough in half. Stretch and fold the dough, envelope-style, again using the bench scraper as needed. Form each into a ball. Cover and allow the dough to rest for 30 minutes.
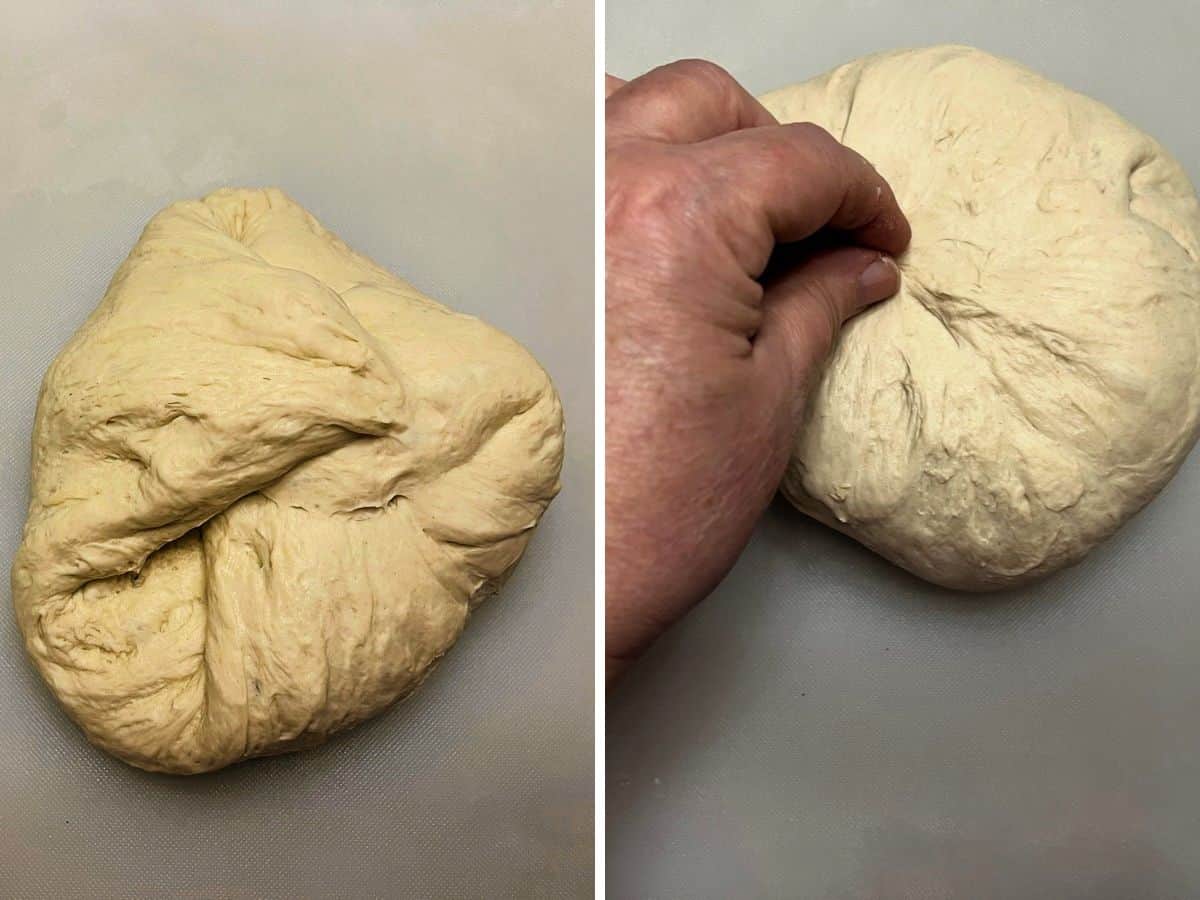
Flatten each ball into a rectangle. Stretch and then fold the dough, envelope-style. Form a nice smooth ball, pinching on the bottom.
To help seal the bottom, slide the bottom of the dough against a clean unfloured work surface and turn it 90 degrees. Repeat this 2-3 times to seal the seam.
Alternate Way to Bake This Bread
Here is another way to bake this bread, especially helpful if time is a constraint in your day. Once your dough has gone through the stretch-and-folds mentioned above, you may divide the dough and shape each into a standard loaf form.
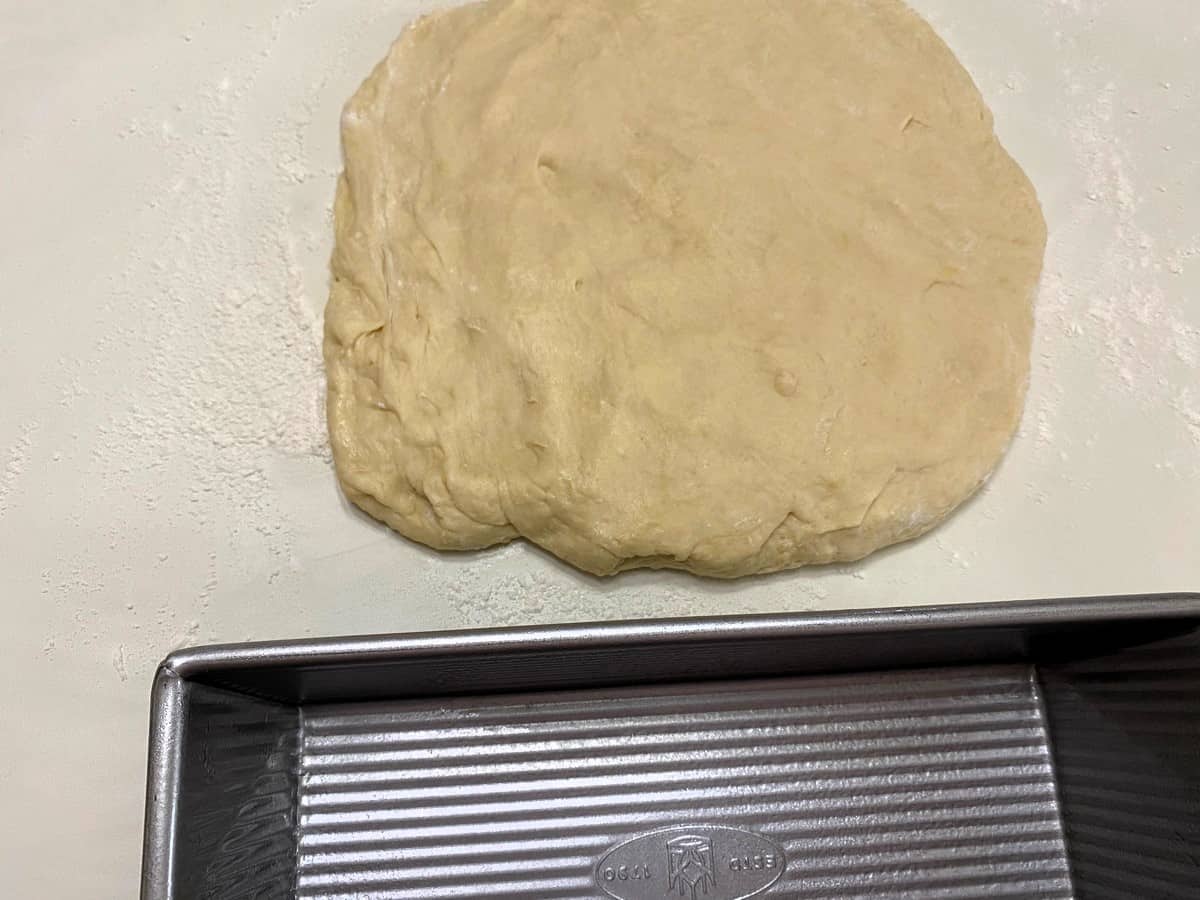
To form standard loaf, roll or press dough into a rectangle large enough to fit the pan. Begin rolling from one long edge, then pinching ends together to seal.
Place the formed loaf seam-side down into a loaf pan that has been greased and floured (or sprayed with a flour baking spray). For this recipe, I use a pullman loaf pan and a standard loaf pan–one is larger than the other.
Allow the dough to rise until nearly double, approximately 2-3 hours, depending on the temperature of your kitchen. Place a pan of hot water on bottom rack to help create steam. Bake in preheated 450°F oven for 20-25 minutes, until tops are lightly golden brown and sound hollow when tapped on top with your knuckle. (If using a pullman loaf pan, I will remove the lid after 20 minutes and continue baking the bread for another 5-7 minutes to brown the top.)
Remove loaves from oven and carefully turn out bread from pan to cool on wire racks.
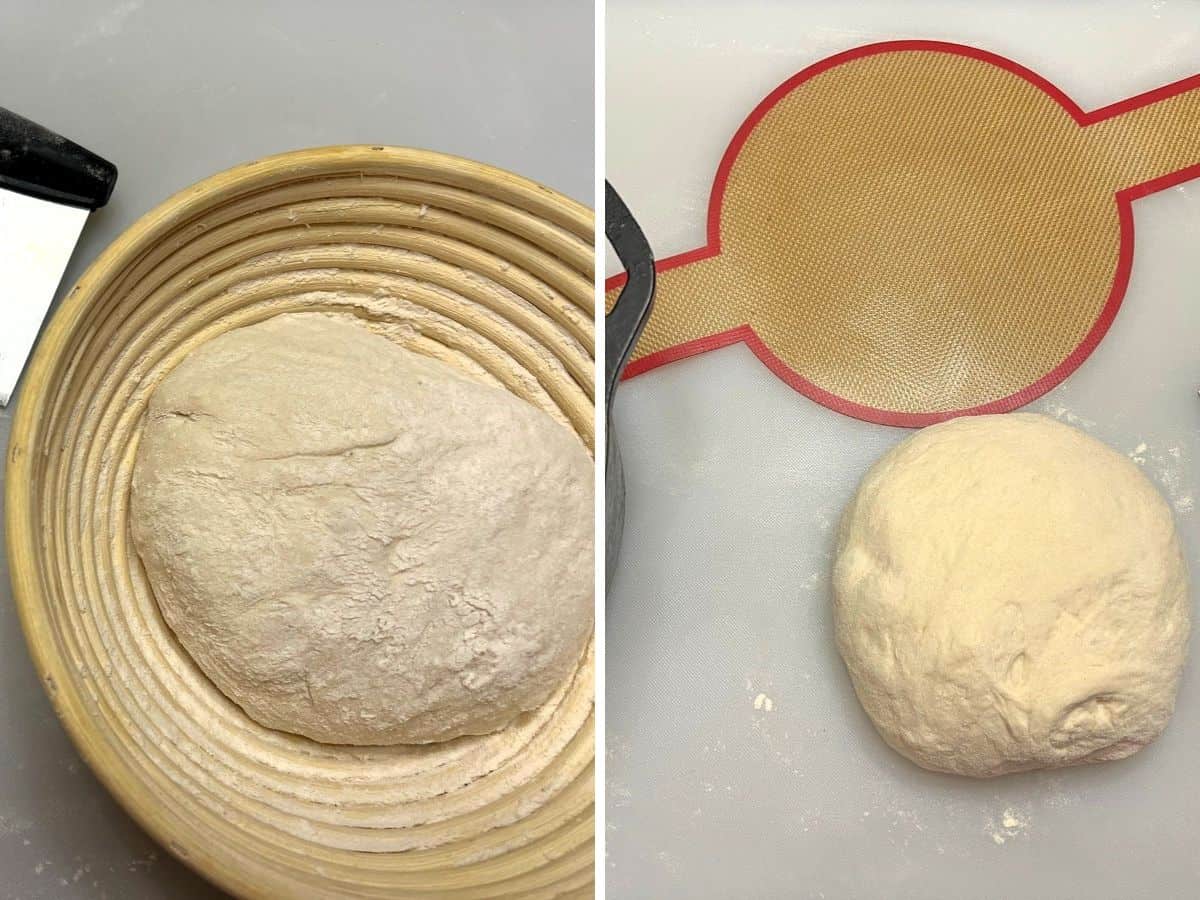
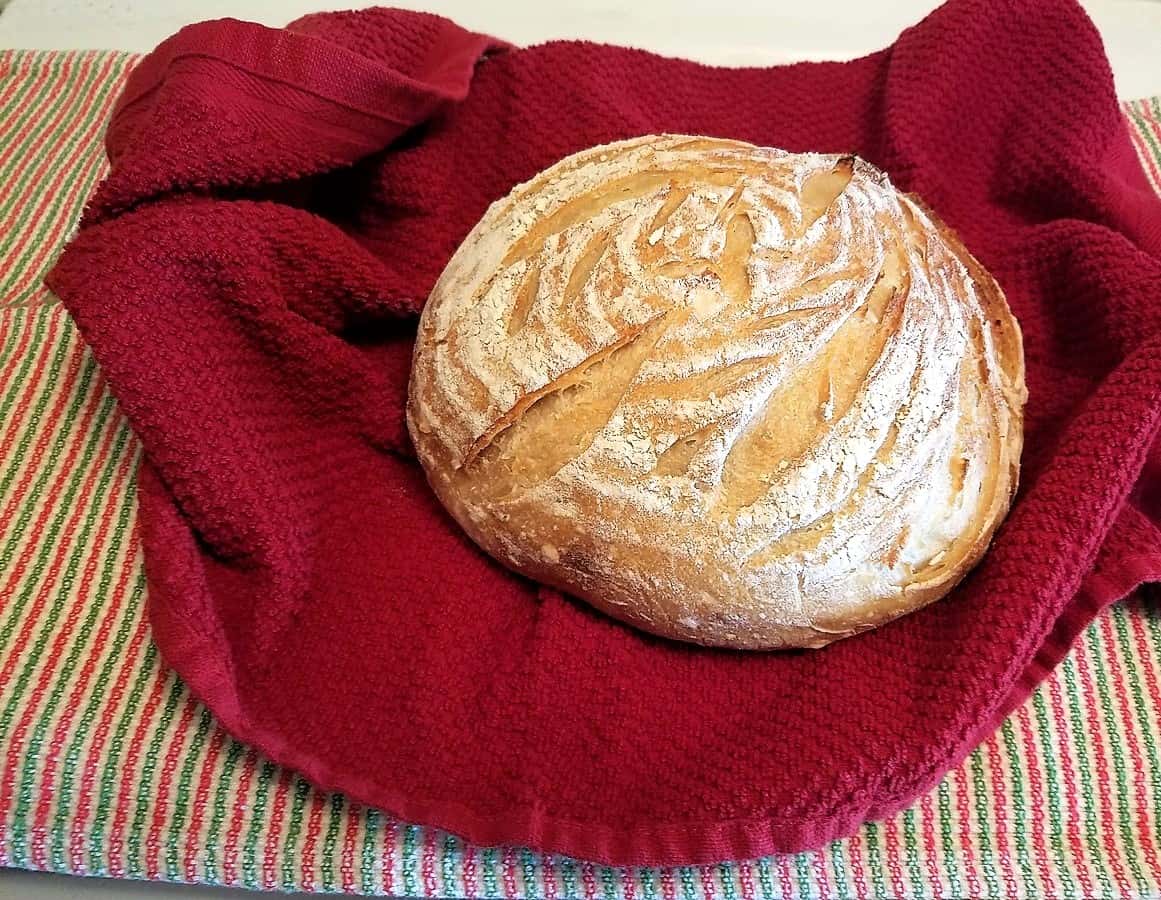
At this point, you may either place the dough into a Dough Banneton Basket that has been sprinkled with Brown Rice Flour or place it on a greased sheet of parchment paper or a bread sling. If using a bread sling, go ahead and transfer the dough to a Dutch oven.
A Bread Banneton may be used to help shape the dough and give the bread a pretty design in the final rise. It is not necessary, but it’s a fun and easy way to decorate the bread. Brown Rice Flour is a non gluten flour that will not dissolve into the dough. This helps keep it from sticking to the basket.
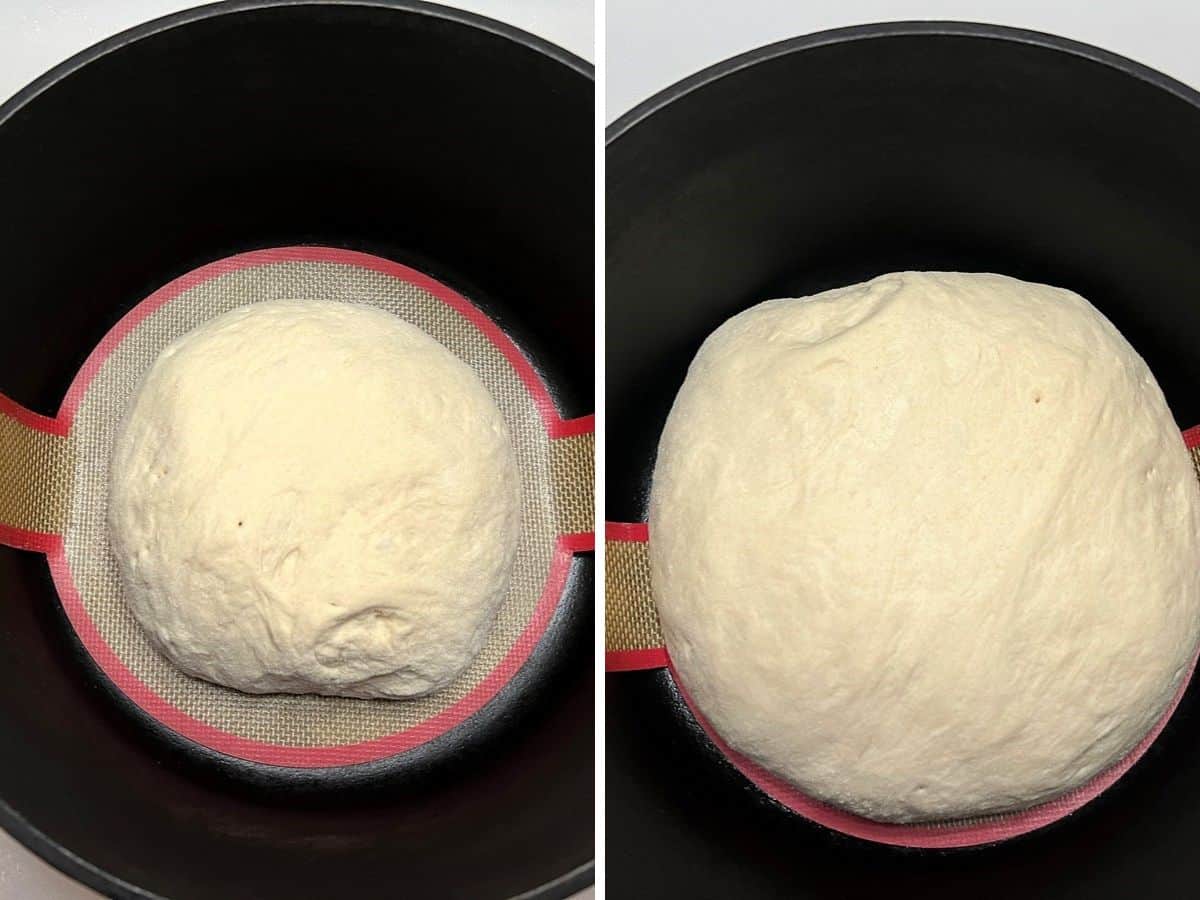
Cover and allow the dough to rise for 1-3 hours until puffy. Halfway through the rising time, preheat the oven to 475°F.
Score and Bake the Bread

Uncover the risen dough. If using the Banneton, turn dough out onto a bread sling or sheet of parchment paper.
I highly recommend purchasing a bread sling when making sourdough. It allows you to lower and lift the bread in and out of the Dutch oven without burning yourself or harming the risen bread. They make them in both round and oval shapes for different sized loaves.
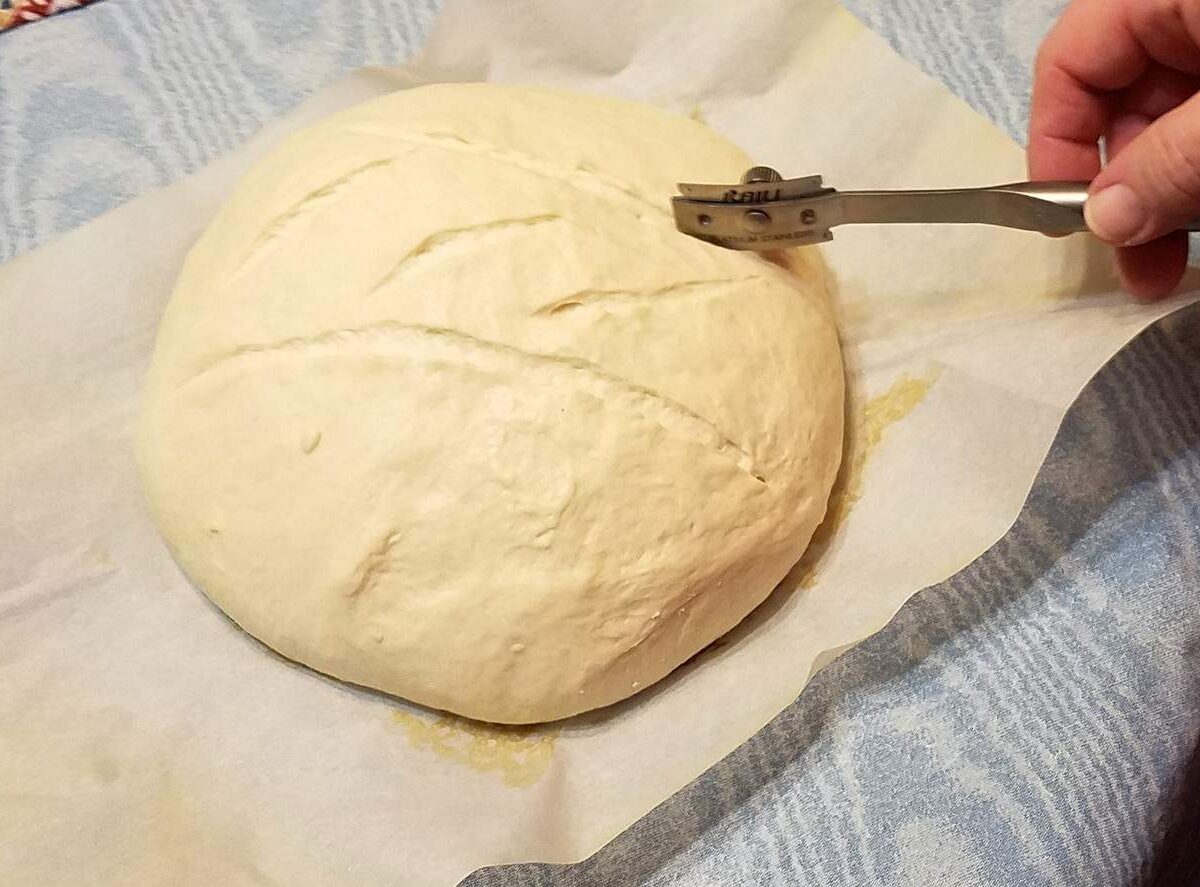
Using a knife or bread lame, score the bread with one or two fairly deep horizontal slashes in each.
If you’re feeling creative, now is the time to decorate your bread with other designs. Just search Sourdough Bread Designs online to see fabulous designs by creative bakers.
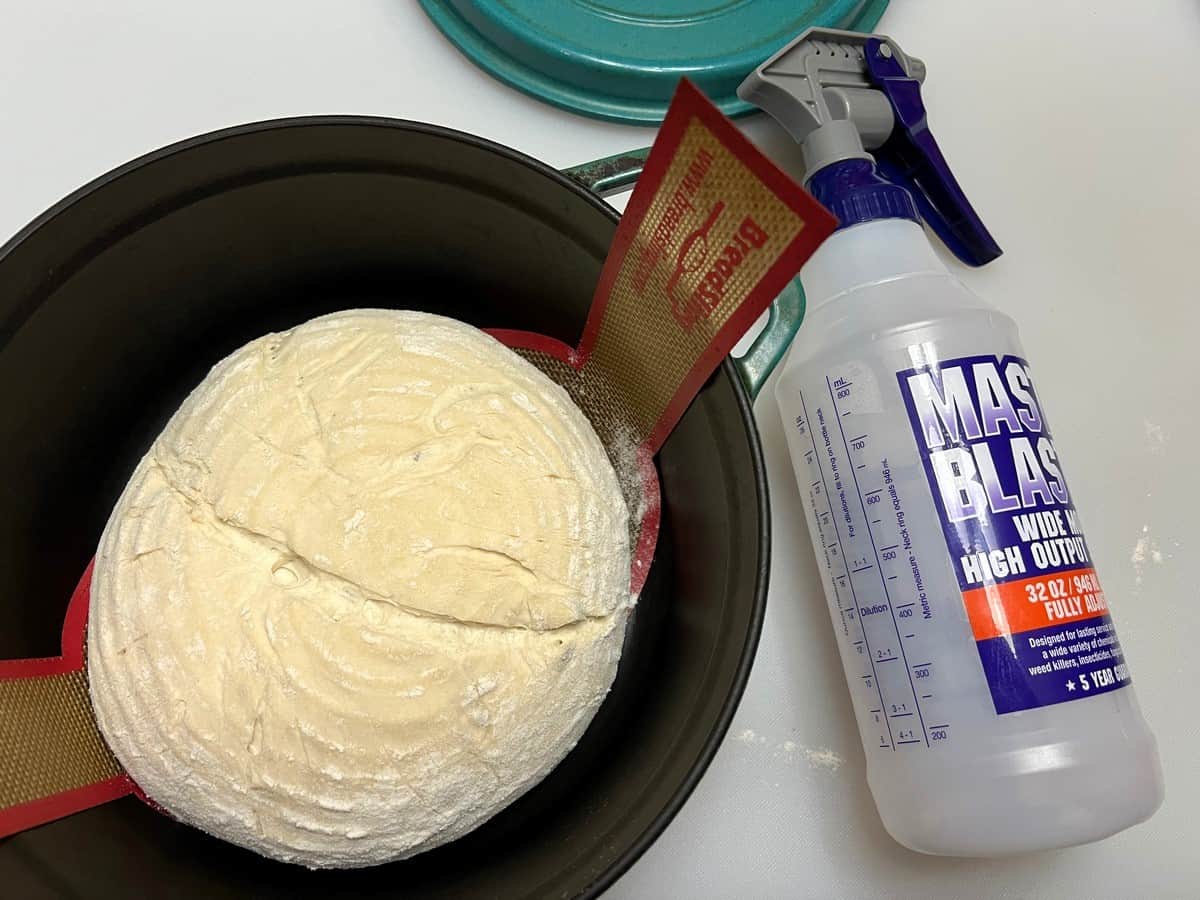
Next, holding opposite sides of the sling or parchment paper, lift the dough and place in a 4-6 quart Dutch Oven. Spritz with water (2-3 times) to help create steam in the oven. Cover with lid and bake in preheated oven for 20 minutes.
Baking the bread inside a covered Dutch Oven helps give the bread a “steamed” quality like that from a wood-fired oven.
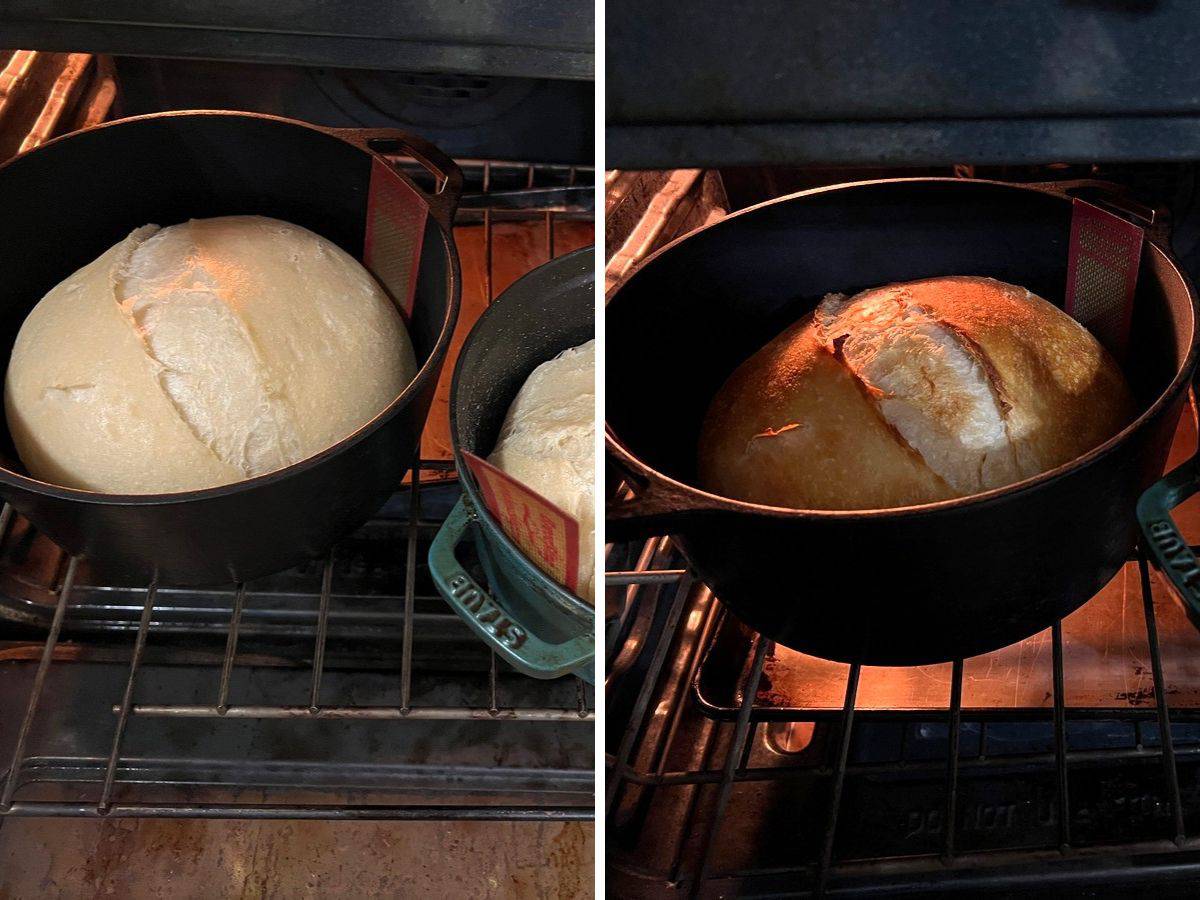
After this initial baking period, uncover each Dutch oven and reduce the oven temperature to 450°F. Continue baking an additional 12-14 minutes until golden brown. To prevent your loaves from burning on the bottom, place a baking sheet beneath the Dutch Ovens on a lower rack.
If time allows, you may cure your bread by turning off your oven and cracking open the oven door for 20 minutes. This will give your bread a crackly, crunchy crust.
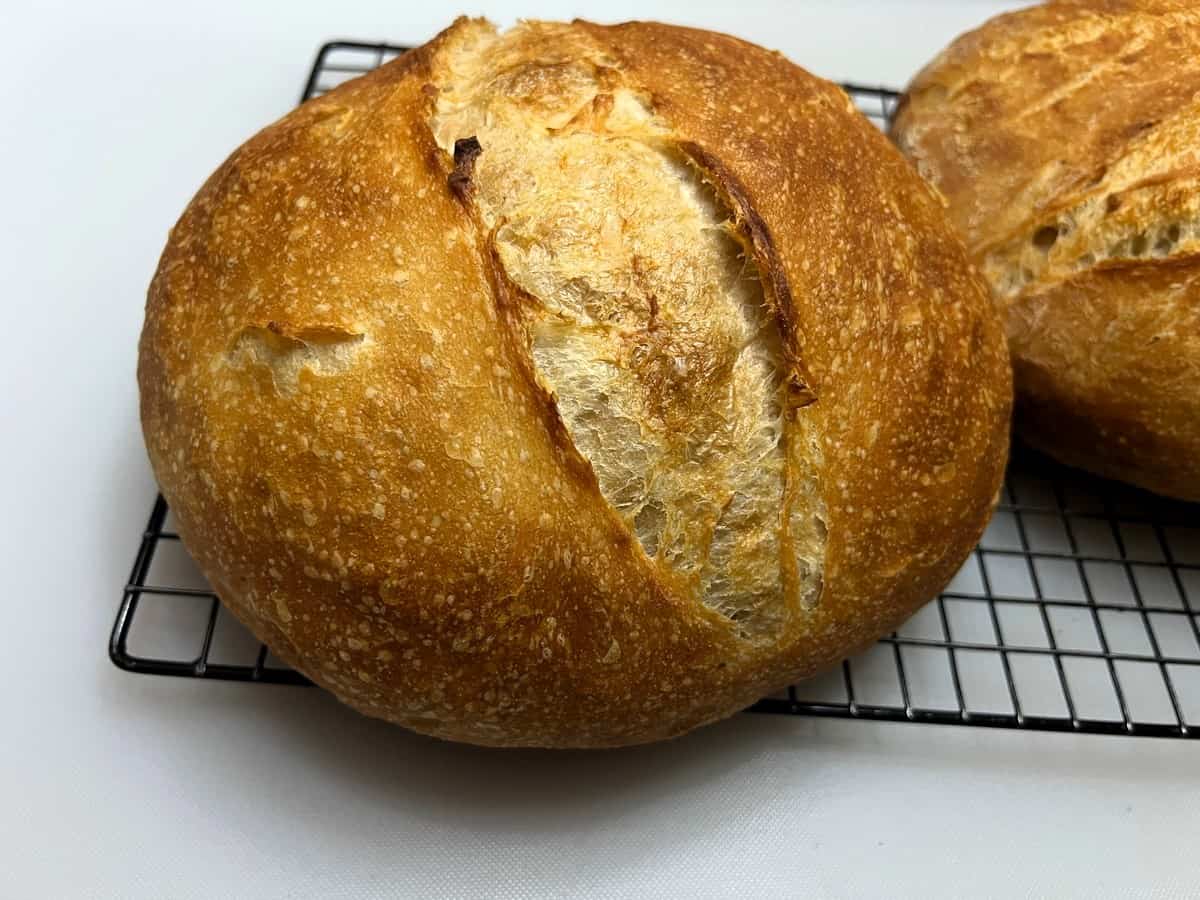
Transfer bread from Dutch Ovens to wire racks to cool completely.
As the bread cools, you may notice a crackling sound from the bread. I think this is quite fun to hear.
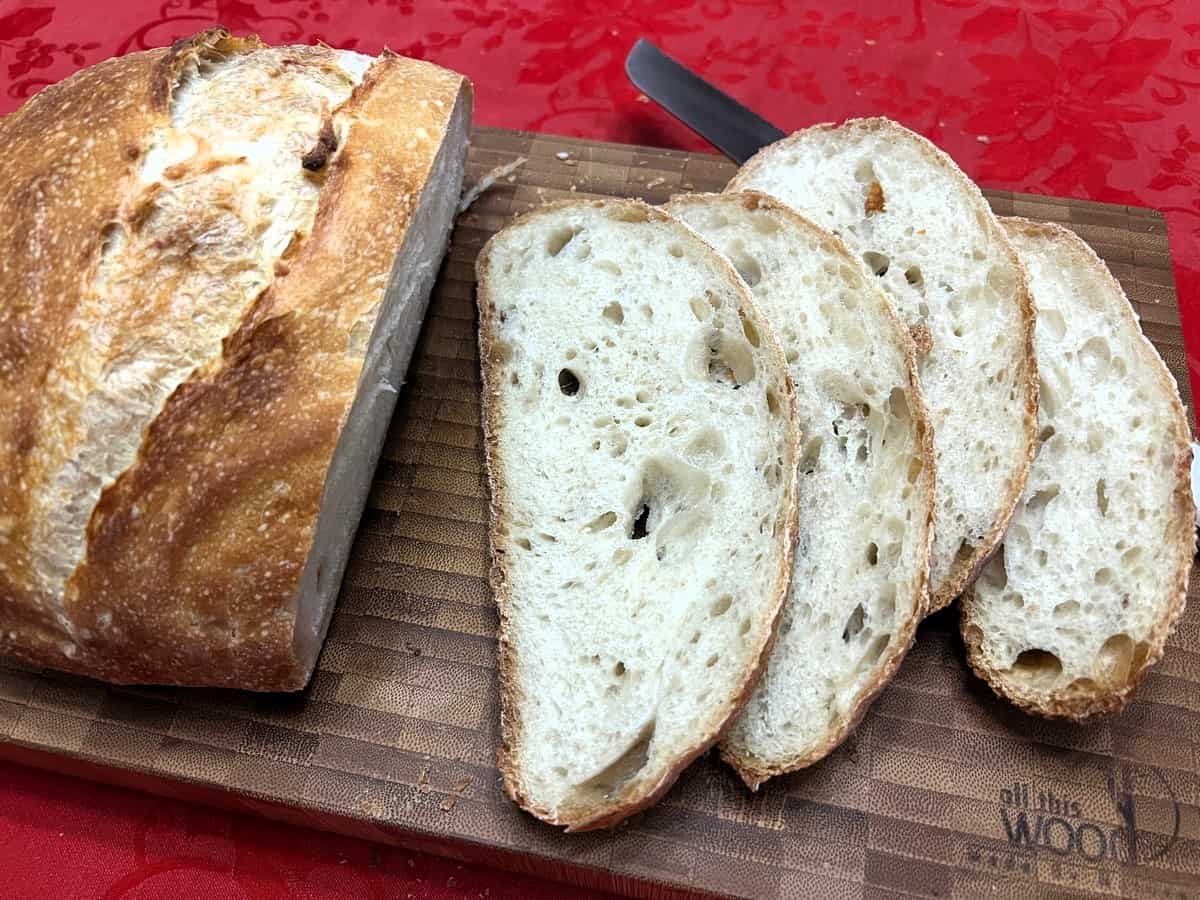
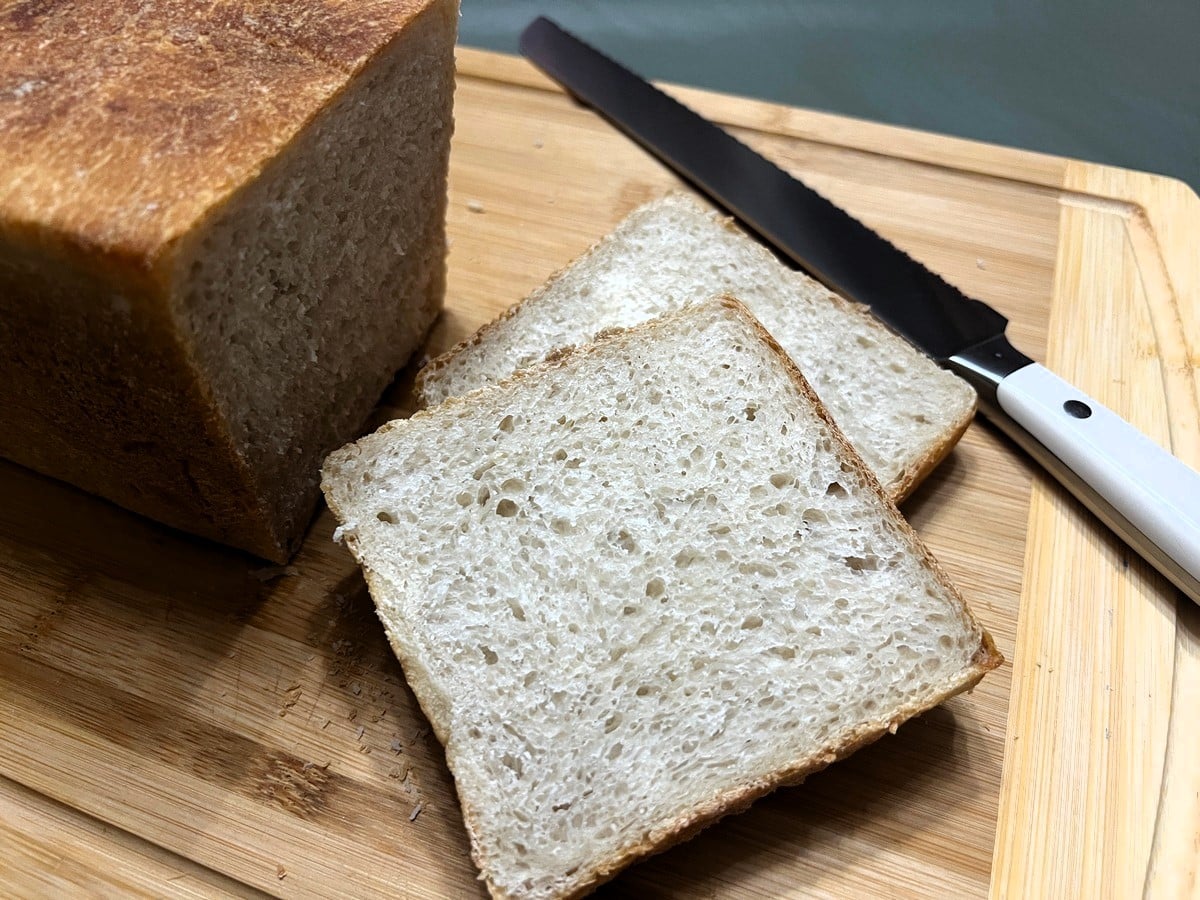
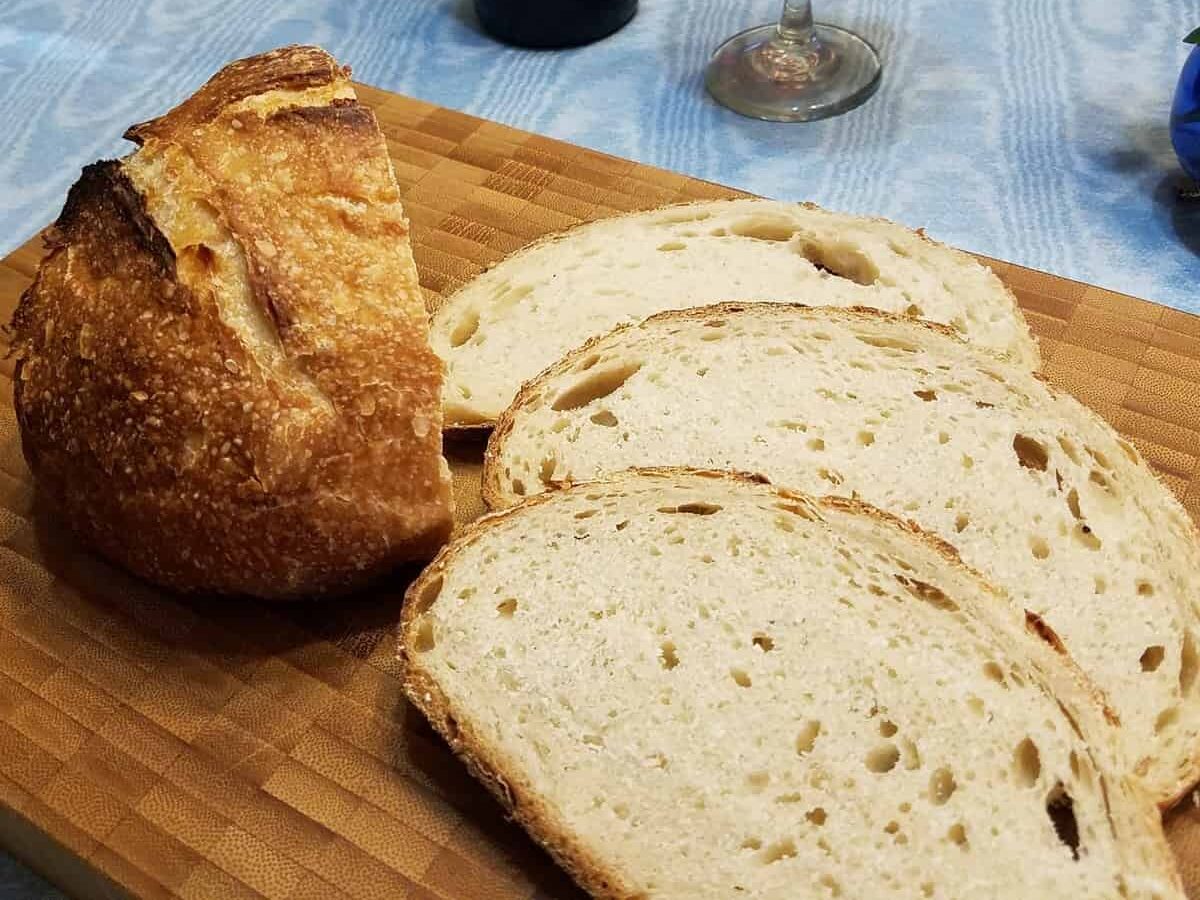
All of these steps helped me to produce a Tangy Sourdough Bread that I am very pleased with. It has wonderful flavor, but now the outside is a beautiful deep golden brown that is crunchy, while the inside is pleasingly soft and chewy.

Tangy Sourdough Bread is delicious served alone with butter, or sliced to make wonderful Grilled Cheese Sandwiches or Sourdough Croutons. If you don’t have a sourdough starter, you may make your own HERE.
This recipe makes 2 loaves, which will serve approximately 16-20 people.
Storing Sourdough

Store baked loaves in a bread box, bread bags, or in gallon freezer bags. Please note that plastic bags will soften the outer crust. Store at room temperature for 5-7 days.
You may also freeze loaves in gallon freezer bags for up to a month. To defrost, always allow frozen bread to come to room temperature before removing from the bag. Then reheat or toast as desired.
Browse Similar Categories
Tangy Sourdough Bread
Ingredients
- 1 cup sourdough starter "fed"
- 1 1/2 cups lukewarm water
- 5 cups all-purpose flour divided
- 2 teaspoons granulated sugar
- 2 teaspoons kosher salt or artisan salt
- 1/4 cup water
- 4 tablespoons Brown Rice Flour

(As an Amazon Associate, I earn from qualifying purchases.)
Instructions Click to Start Cooking
- In a large mixing bowl, combine 1 cup (250 g) sourdough starter "fed" (fed), 1 1/2 cups (3.55 dl) lukewarm water, and 3 cups of all-purpose flour. Stir vigorously with wooden spoon until combined, approximately 1 minute. Cover with plastic wrap and let rest at room temperature for 1 hour. Refrigerate overnight.
- The next day, remove the levain from the refrigerator and allow to come to room temperature, about an hour.
- In a large mixing bowl, with kneading hook attachment, combine the levain with the remaining 2 cups all-purpose flour, 2 teaspoons (9.86 ml) granulated sugar, and 2 teaspoons (9.86 ml) kosher salt or artisan salt. Begin mixing at a low speed, adding up to 1/4 cup (59.15 ml) water as needed to make a smooth dough. Continue kneading for 5-7 minutes.
- Transfer dough to a large greased bowl and cover with plastic wrap. Allow the dough to rise until it has doubled. (This may take 2-3 hours). (Remove the dough at each hour interval to stretch and fold the dough on a smooth surface, envelope-style to work the gluten in the dough. The dough will most likely be sticky, but refrain from using flour. Instead, use a stainless bench scraper to lift the dough from the work space.)
- Once the dough has doubled, divide the dough in half. Stretch and fold the dough, envelope-style, again using the bench scraper as needed. Form each into a ball. Cover and allow the dough to rest for 30 minutes.
- Flatten each ball into an rectangle. Stretch and then fold the dough, envelope-style. Form a nice smooth ball, pinching on the bottom. Slide the bottom of the dough against your work surface to seal the seam.
- At this point, you may either place the dough into a Dough Banneton Basket that has been sprinkled with 4 tablespoons (59.15 ml) Brown Rice Flour or place it on a greased sheet of parchment paper or bread sling. Cover and allow to rise for 1-3 hours until puffy. Halfway through the rising time, preheat oven to 475℉.
- Uncover the risen dough. If using the Banneton, turn dough out onto a bread sling or sheet of parchment paper. Using a knife or bread lame, slice or or two fairly deep horizontal slashes in each.
- Holding opposite sides of the sling or parchment paper, lift the dough and place in a 4-6 quart Dutch Oven. Spritz with water (2-3 times) to help create steam in the oven.
- Cover with lid and bake in preheated oven for 20 minutes.
- After this initial baking period, uncover each Dutch oven and reduce the oven temperature to 450℉. Continue baking for an additional 12-14 minutes until golden brown. To prevent your loaves from burning on the bottom, place a baking sheet beneath the Dutch Ovens on a lower rack.
- If time allows, you may cure your bread by turning off your oven and cracking open the oven door for 20 minutes. This will give your bread a crackly, crunchy crust.
- Transfer bread from Dutch Ovens to wire racks to cool completely before slicing. Makes 2 loaves of bread.
Nutrition
Notes
Did you make this recipe?
Let me know how it turned out!


I am looking forward to trying this recipe. What type of flour do you recommend?
Hi Jen, I use all-purpose flour for my sourdough recipes. Hope it goes well. I’d love to hear back from you when you try it!
Turned out great!! Very easy to make. I cut the recipe in half and skipped the step to divide and rest for another 30 minutes. I also left mine in the fridge a little longer (18 hours) by mistake and it turned out tang-tastic! I’ll be using this as my sourdough standard.
Thanks so much for sharing your experience. I’m glad the bread turned out well for you. I’ve also kept mine in the fridge for 30+ hours, when my schedule went wonkie! No worries. It’s all good, and it turned out fine!
I made this last weekend and created one giant loaf. The crust was lovely and crunchy, and the inside was tender and tangy. I love experimenting with sourdough, and this recipe is one that I will make often. It’s well worth the time.
Hi Melissa! I’m so glad that you enjoyed this sourdough recipe. It’s one of our favorites that I make every week. My granddaughter loves it so much that I plan to make her one to give to her for her birthday. Thanks for leaving a comment!
I WANT TO TRY ONE BIG LOAF, HOW LONG DID YOU BAKE IT?
Hi Sherri, I think you may have a hard time baking all of the dough in a large enough Dutch oven, but you’re welcome to try it. I would think you may need to increase the baking time by 10 minutes. Perhaps try an additional 5 minutes at 375, and then add another 5 minutes to the baking time at 350. Does that make sense? I’d love to know how this turns out. Best wishes! Maybe Melissa will join us hear to tell the details of her experience.
Hi I’m always trying different kinds of sourdough recipes can I bake this in the Square pans with slide on lids? or on a baking stone?
Hi Yvonne, I’ve never baked this bread in a pan with a slide on lid, but for sure you may bake it on a baking stone, which is how I first made this bread long ago. Here are my additional instructions for baking this bread on a baking stone: After the first rise, gently divide the dough in half. Shape each into an oval ball and place on a sheet of parchment paper. Cover and allow to rise for 1-2 hours until puffy. Toward the end of the rising time, preheat oven to 425 degrees.
Spray the loaves with lukewarm water. Slice two fairly deep horizontal slashes in each. Bake on a hot baking stone for 20 minutes until they are a deep golden brown. Cool on wire rack. Makes 2 loaves.
Thank you so much I’m going to try it on a baking stone
Great. Please let me know how it turns out! Happy Baking!
I make bread for my dad who’s diabetic. What does the sugar do—can I leave it out?
Hi Diana, Thank you for contacting me about this. While I have never tried making the recipe without sugar, you should be able to do so. The sugar helps activate the natural yeast, so you might expect different rising times. Please let me know how it turns out.
Could you sub with bread flour?
Hi Michelle, Bread flour has a higher protein count than all-purpose, so the end result might produce a chewier crumb. But that might be a great thing! I’d be willing to give it a try. If you do, please let me know how it turns out!
Have been looking for an extra tangy recipe – so happy I found yours. Could you kindly post the weight of the ingredients? Also, I love a hard crust but some people in my family don’t. Is there a way to keep a boule crunchy without being too hard? Thanks!
Hi Sophia, I’m so sorry for not responding to this until now. Inside the recipe card, you have the option for US or Metric. For weights, simply slide the button to Metric. As for the hard crust–which I also love. Place the bread inside a plastic gallon bag, and the bread will be much softer the next day. I’m not sure there is a way to have both–hard and crunchy and soft. But if you find a way, please let me know!
Could you still make this without a stand mixer?
Hi Chloe, Yes, you may hand knead it if you’d prefer. It may be pretty sticky, though, so you’ll want to use a bench knife to aid in the kneading/folding process rather than use extra flour.
My problem with this recipe isn’t really the taste, but that she didn’t have us weighing in grams like a professional sourdough maker baker. I had to Look up everything from cups to grams and that’s an extra step. I just don’t need…
Hi Nicole, I appreciate your response (but not so much the 1 star rating). You may easily convert the recipe from US customary to metrics inside the recipe card. I’m sorry you didn’t see that option but it is there for anyone who prefers to weigh their ingredients. I have never called myself a professional, and I prefer the old way of measuring with cups and spoons.