


These Sourdough Chocolate Croissants (aka pain au chocolat) are out-of-this-world delicious, bakery-style beautiful, and simply wonderful. They are so flaky, they fall apart at the touch. Lots of buttery layers. With chunks of yummy dark chocolate tucked inside the center that leaves you licking your lips for more.


Sourdough Chocolate Croissants are Amazing!
I’ve been making sourdough bread for nearly eight years and have been experimenting with even more recipes to Covid-19 and the popularity of sourdough.
Some of those experiments have been Sourdough Artisan Crackers, Sourdough Cider Donuts and Fritters, and now these amazing croissants.
Be sure to stock up on butter when it is on sale!! It freezes perfectly!

Yes, this recipe is more time-intensive than most. If you’re like me, you’ll be more than willing to invest the extra time in order to get such an amazing and lovely outcome.
This recipe is for special occasions. Or the simplest of occasions when you want to treat your someone special with something special.
Depending on whether we have weekend company, I may double this recipe, so there are plenty of croissants to go around. Oh, and be sure to stock up on butter when it is on sale!
Ingredients for Sourdough Chocolate Croissants
(As a Walmart Affiliate, I earn from qualified purchases at the links below. See the full recipe at the bottom of this post.)
Instructions for Making this Recipe
Gather your ingredients so that you have everything close at hand on the counter or table.
Make the Dough
Using a medium mixing bowl, combine the sourdough starter, all-purpose flour, water, granulated sugar, softened butter, egg, and kosher salt. Mix together using a dough whisk or wooden spoon until the dough comes together and all the flour is mixed in.
The dough may be pretty soft and sticky at this point.

Place the dough in a greased bowl. Cover with plastic wrap and allow to rest for 50-60 minutes. After the allotted time, place the dough onto an “unfloured” workspace and stretch and pat it out to make a circle or square.
Taking one edge by the hand, stretch and fold it to the center. Then take the opposite side of the dough and stretch and fold it to the center, so that both sides meet. Do the same for the remaining two edges. Pinch the ends together, and smooth into a ball. This is called folding the dough.
If necessary, use a bench scraper to help fold the dough.
Turn the dough over and go through this folding process again 1-2 times.
Folding the dough like this will help develop the natural gluten and strengthen the dough.
Return the dough to the greased bowl and allow to rest in the refrigerator for 2 hours.
Prepare the Butter Layers

Cut two 12″ x 12″ pieces of waxed paper and lay one of them on the counter or workspace. Slice butter into tablespoons and lay them in the middle of the paper to form a square. Place the second piece of waxed paper over the top to cover the butter.
When possible, I try to use European butter for this recipe. European butter has a high fat content than regular butter. (12 oz. vs 11 oz.) If you don’t have access to European butter, that’s okay. Just use regular butter. Please note, too, that I always use salted butter. It’s just what I have on hand and it’s what I do.

Using a rolling pin or the flat side of a meat tenderizing mallet, beat the cold butter to flatten and warm it. Continue beating it until it has flattened and spread to form an 8″ x 8″ square.
Take the cold dough from the refrigerator and place it on a lightly floured workspace. Using a rolling pin, roll the dough into a square that is 12″ x 12″.

Remove the top piece of waxed paper from the butter and place it on the dough so that it’s a diamond on a square. Then peel off the remaining paper.
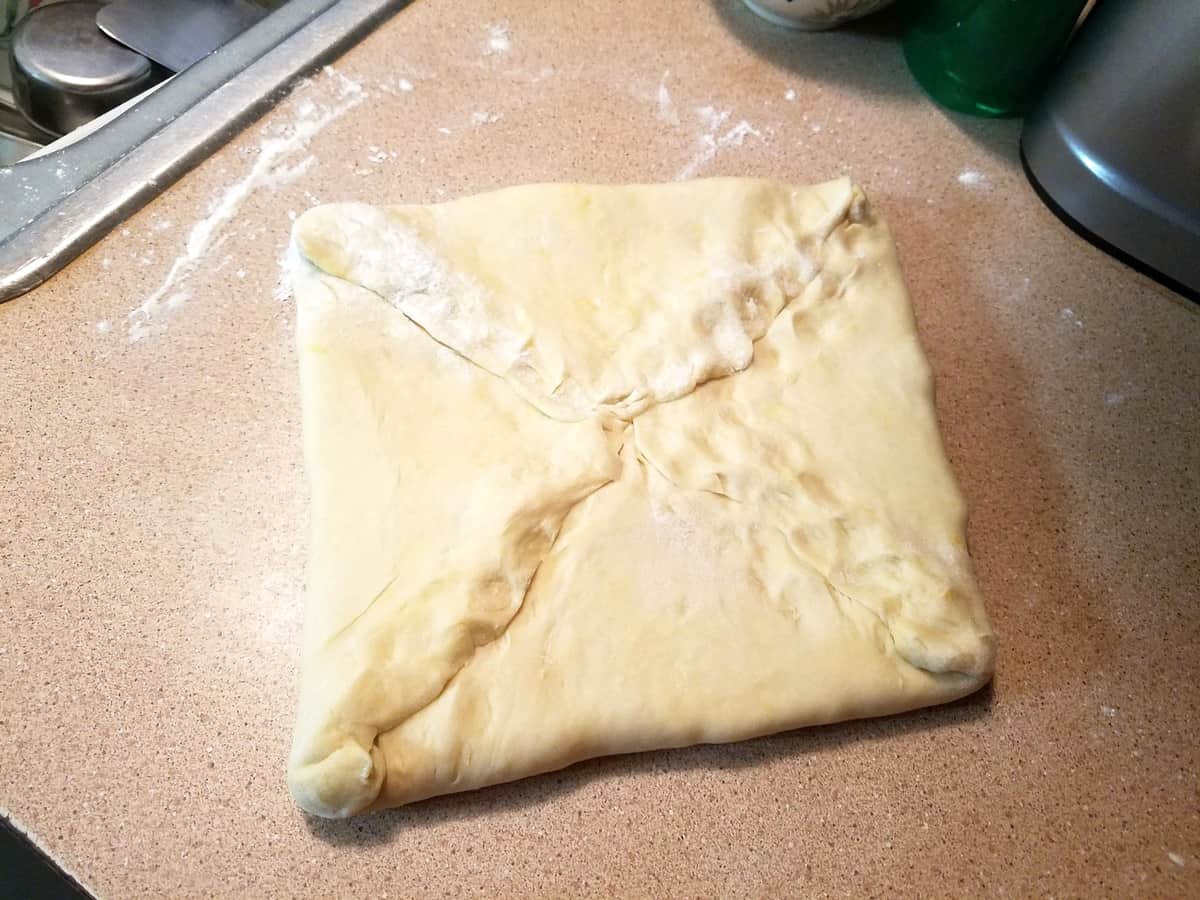
Fold the corners of the dough to meet in the center and cover the butter. Pinch the ends together to seal, then lightly tap the dough with a rolling pin to flatten and secure the seams. You should now have a butter-enclosed dough square that is 8″ x 8″.
Turn the Dough
Using a rolling pin, roll the dough into a 8″ x 18″ rectangle. This may take a little time. Roll gently so you don’t manipulate the butter too much. (You want the butter to stay in one layer and not get clumped up.)

Fold the right 1/3 of dough toward the middle, and then fold over the left 1/3 of dough like a trifold letter. This is called the “first turn.”
Pivot the dough 90 degrees so that the sides are now top and bottom. Using a rolling pin, roll out the dough to form an 8″ x 12″ rectangle. Once more fold the dough in thirds like a letter. This is the “second turn.”
Place the folded dough in a plastic freezer bag and refrigerate for at least 60 minutes.

After the resting time, roll the dough into an 8″ x 12″ rectangle and fold the dough like a letter. This is the “third turn.” Repeat as before for a “fourth turn.” Place the dough in the plastic bag and refrigerate for 60 minutes.
Assemble the Croissants
Line a baking sheet with parchment paper or a silicone baking mat. Roll the chilled dough into a 8″ x 12″ rectangle.
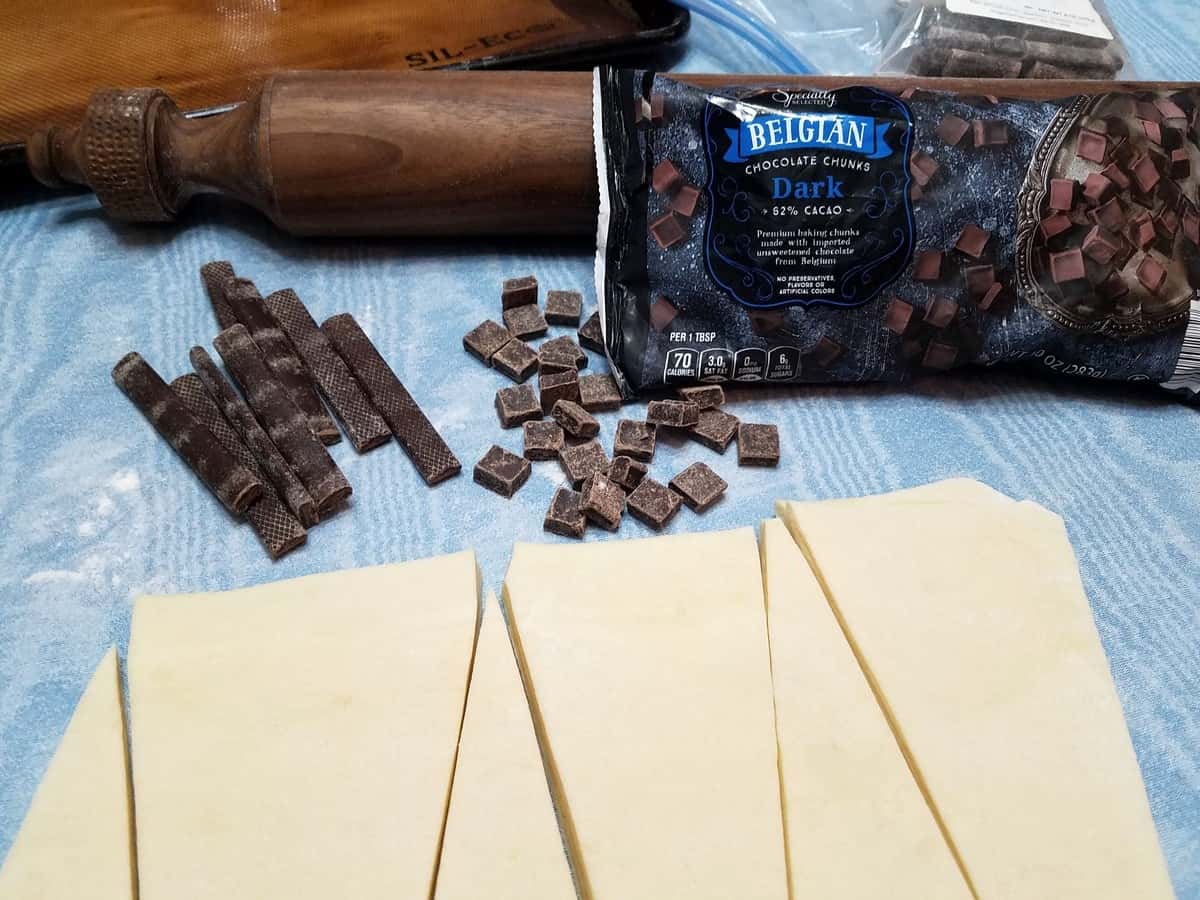
Using a ruler and pastry roller, cut the dough into triangles with 4″ bases. Save the two half pieces on each end and pinch them together to make one triangle. This will give you a total of 7 triangles.

Place Pain au Chocolat Sticks at the base of each triangle. Tightly roll the dough from the base to the tip.
In my experiments with this recipe, I used both Pain au Chocolat Sticks as well as Belgian Dark Chocolate Chunks that I purchased at Aldi. They both melted the same, and my daughters and I couldn’t tell the difference when we ate the croissants. I think Ghirardelli semi-sweet or bittersweet chips would bring similar results. Also, when I used the Pain au Chocolat Sticks, I preferred two sticks per croissant.
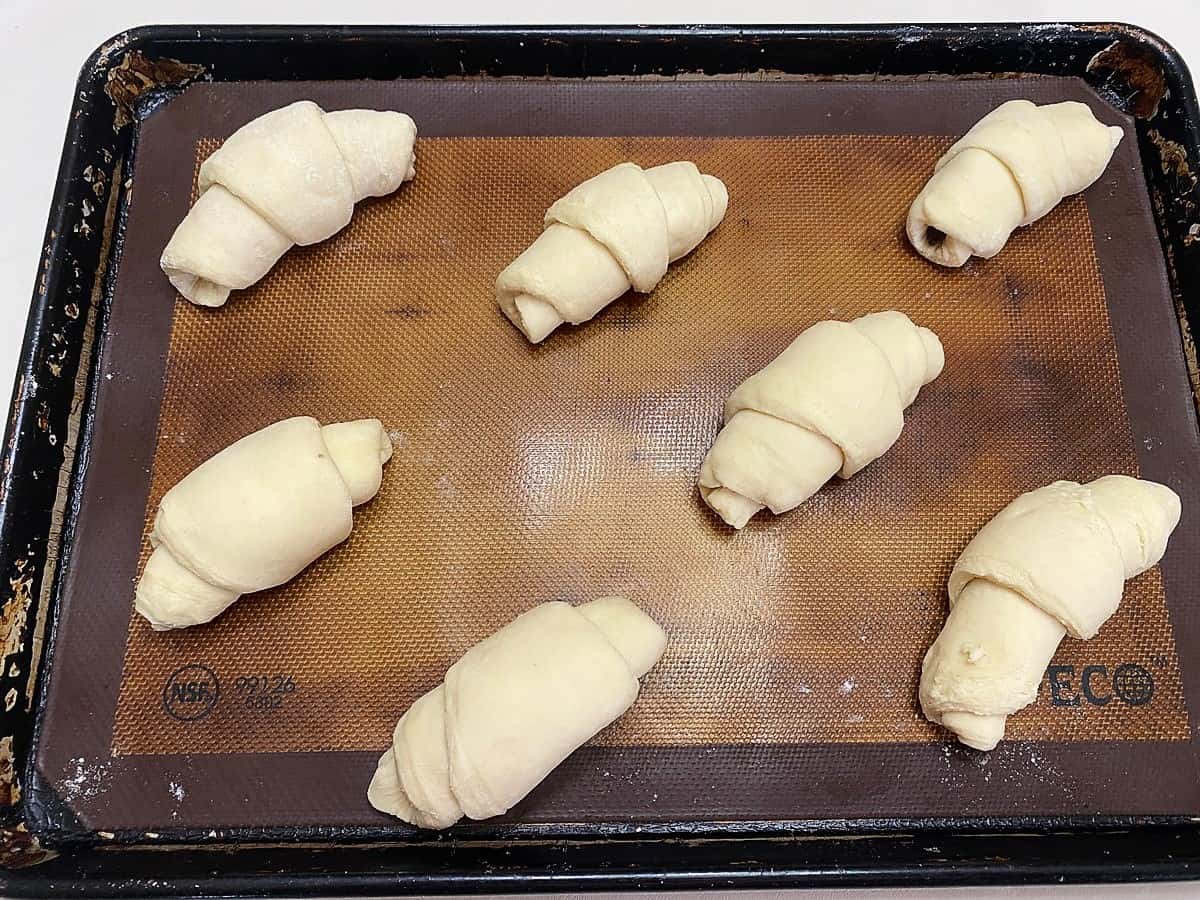
Place the croissants 3″ apart on the prepared baking sheet, curving ends inward to form a crescent shape.
Cover the shaped dough with plastic wrap (or a clean garbage bag) and leave to proof at room temperature for 18-20 hours. When ready to bake, they should be at least 50% larger than at the start, and will be light and puffy to the touch.

Preheat oven to 400°F. Lightly brush the croissants with egg wash (1 egg and 1 tablespoon water).

Bake for 20-22 minutes or until dark golden brown.

Sourdough Chocolate Croissants are best served warm from the oven with a cup of steaming coffee or tea. However, they may be served the next day heated in a toaster oven–if they last that long! This recipe will make 7 croissants.
Browse Similar Categories

Sourdough Chocolate Croissants
Ingredients
- 1/2 cup sourdough starter fed and active
- 1 2/3 cups all-purpose flour
- 1/3 cup water
- 2 1/2 tablespoons granulated sugar
- 2 tablespoons butter room temperature
- 1 large egg
- 1 teaspoon kosher salt
- 1 cup cold European butter for layering
- 8 oz Callebaut Semisweet Pain au Chocolat Sticks
- 1 medium egg + 1 tablespoon water for egg wash


(As an Amazon Associate, I earn from qualifying purchases.)
Instructions Click to Start Cooking
- Using a medium mixing bowl, combine the sourdough starter, all-purpose flour, water, granulated sugar, softened butter, egg, and kosher salt. Mix together using a dough whisk or wooden spoon until the dough comes together and all the flour is mixed in. The dough may be soft and sticky at this point.1/2 cup (125 g) sourdough starter, 1 2/3 cups (208.33 g) all-purpose flour, 1/3 cup (78.86 ml) water, 2 1/2 tablespoons (36.97 ml) granulated sugar, 2 tablespoons (29.57 ml) butter, 1 large (1 large) egg, 1 teaspoon (4.93 ml) kosher salt
- Place the dough in a bowl coated in cooking spray. Cover with plastic wrap and allow to rest for 50-60 minutes.
- After the allotted resting time, place the dough onto an "unfloured" workspace and stretch and pat it out to make a circle.
- Taking one edge by the hand, stretch and fold it to the center. Then take the opposite side of the dough and stretch and fold it to the center, so that both sides meet. Do the same for the remaining two edges. Pinch the ends together, and smooth into a ball. This is called folding the dough.
- Turn the dough over and do it again 1-2 times. Folding the dough like this will help develop the natural gluten and strengthen the dough. Return the dough to the greased bowl and allow to rest in the refrigerator for 2 hours.
- Cut two 12" x 12" pieces of waxed paper and lay one on the counter or workspace. Slice butter into tablespoons and lay them in the middle of the paper to form a square. Place the second piece of waxed paper over the top to cover the butter.1 cup (236.59 g) cold European butter
- Using a rolling pin or the flat side of a meat tenderizing mallet, beat the cold butter to flatten and warm it. Continue beating it until it has flattened and spread to form an 8" x 8" square.
- Take the cold dough from the refrigerator and place it on a lightly floured workspace. Using a rolling pin, roll the dough into a square that is 12″ x 12″.
- Remove the top piece of waxed paper from the butter and place it on the dough so that it's a diamond on a square. Peel off the remaining piece of paper.
- Fold the corners of the dough to meet in the center and cover the butter. Pinch the ends together to seal, then lightly tap the dough with the rolling pin to flatten and secure the seams. You should now have a butter-enclosed dough square that is 8" x 8".
- Using a rolling pin, roll the dough into a 8″ x 18″ rectangle. This may take a little time. Roll gently so you don’t manipulate the butter too much. (You want the butter to stay in one layer and not get clumped up.)
- Fold the right 1/3 of dough toward the middle, and then fold over the left 1/3 of dough like a trifold letter. This is called the "first turn."
- Pivot the dough 90 degrees so that the sides are now the top and bottom. Using a rolling pin, roll out the dough to form an 8" x 12" rectangle. Once more, fold the dough in thirds like a letter. This is the "second turn."
- Place the folded dough in a plastic freezer bag and refrigerate for at least 60 minutes.
- After the resting time, roll the dough into an 8" x 12" rectangle and fold the dough like a letter. This is the "third turn." Repeat as before for a "fourth turn." Place the dough in the plastic freezer bag and refrigerate for 60 minutes.
- Line a baking sheet with parchment paper or a silicone baking mat. Roll the chilled dough into an 8" x 12" rectangle.
- Using a ruler and pastry roller, cut the dough into triangles with 4" bases. Save the two half pieces on each end and pinch them together to make one triangle. This will give you a total of 7 triangles.
- Place Pain au Chocolat Sticks at the base of each triangle. Tightly roll the dough from the base to the tip.8 oz (226.8 g) Callebaut Semisweet Pain au Chocolat Sticks
- Arrange the croissants 3" apart on the prepared baking sheet, curving ends inward to form a crescent shape.
- Cover the shaped dough with plastic wrap (or a clean garbage bag) and leave to proof at room temperature for 18-20 hours. When ready to bake, they should be at least 50% larger that at the start, and feel light and puffy to the touch.
- Preheat oven to 400℉. Brush the croissants with egg wash (1 egg and 1 tablespoon water) and bake for 20-22 minutes or until dark golden brown.1 medium (1 medium) egg + 1 tablespoon water
- Sourdough Chocolate Croissants are best served warm from the oven, but they may be served the next day heated up in a toaster oven. This recipe will make 7 croissants.
Nutrition
Notes
Did you make this recipe?
Let me know how it turned out!


Your croissants look amazing, perfectly brown and tender and fluffy. I love making croissants and rolling in all that butter and folding the dough,
Thanks for visiting, Jere. I really enjoy the folding and turning process.
yeah – so happy to find a recipe to use up some of my sourdough starter but in a new way!
It’s always nice to find ways to use up that starter, right!
Wow loved the step-by-step picture presentation of croissants being made. It sure looks so delicious. Wonderful share!
Thanks for visiting Nisha. Croissants are really a fun way to use my sourdough!
I would LOVE to make some of these croissants – I’d have to make them with gluten-free flour but I hope that with your helpful directions and photos I can get them to turn out. I appreciated the detail about what kinds of chocolate worked for you.
Hi Beth! Please let me know if you make some gluten-free croissants. I’d love to know how they turn out! I’m sure you could use any chocolate and it would be great! Thanks for visiting!
Sourdough chocolate croissants sound divine. Sourdough is so good for your gut. What is better than chocolate? Nothing
Hi LaRena! Yes, I’m always telling our daughters that sourdough is gut-healthy food. LOL. Our grandchildren love it, too! Thanks for stopping by.
I love French pain au chocolat and these croissants look amazing. I’ve never made them myself nor baked with sourdough but you have inspired me to give both a try!
I hope you will enjoy making them, Jacqueline! Thanks for stopping by.
Love the chocolate in this!
Awesome, Ella. Thanks for sharing!
Hi, is the reason there’s sugar in the dough to counteract the sourness? I left the sugar out unintentionally and my croissants, although beautiful, taste quite sour. Thanks.
Yes, the sugar will indeed help with the sourness in the dough. I use it with all my sourdough recipes, actually. And the sourdough in this recipe compliments the chocolate beautifully. Please do consider changing your rating. Thank you for your comment.
Thanks for the info on the sugar. I don’t know how to change my rating but I gave you a new one. I didn’t mean to make it so low, since it was really my fault.
Thank you for your kindness, Judy. I hope you will give the croissants another try and that you will enjoy them as much as we do!
So good! Are the macros per croissant?
Hi Whitney, Thank you for commenting. Yes, the nutrition information is based on 1 croissant. Scary, yes? Think of all that butter in them. But so delicious!
Hi! I would like to make this. But Am I reading this right leaving the croissant at room temp for 18-20 hrs?
Hi May, Yes, you are reading that correctly. I like to place the baking sheet in a big trash bag, covered loosely, and allow it to rise inside the bag. For optimum rise, you’ll want to allow it to rise for at least 18 hours, but often 20. Depending on the temperature of your house, this may change. Feel free to check it along the way, to see how it changes. You’ll note the most change after 16-17 hours, but give it at least 18. 🙂 I hope you will enjoy it as much as we do!
Can you put in fridge after final proof if you are not ready to cook yet. My 18 hours is going to be mid day so wanted to see if I could put in fridge and take out next morning and bake. Thanks
Hi Sharon, I have never done that, and honestly, it might be okay, but the croissants are so puffy after their final rise that I would be afraid they might collapse. If timing is a problem, then I would instead roll them up into their shape and refrigerate at that time, setting them out to rise when they will have enough time. And I tend to wait at least 20 hours, for greatest puffiness. Hope this helps.
These turned out DELICIOUS! However, some things to note from my own experience with this recipe. When forming the croissants, make sure that you wrap them super TIGHT! Otherwise they will fall apart as they rise. My starter is INTENSE. So, even 12 hours of final rise time was too long for mine. Unfortunately, mine came out more like a puff pastry cake since they all grew to about 10 times their size and took over my sheet pan. I’m going to try wrapping them tighter and letting them rise for about 6 hours during the final rise time on my next batch. Hopefully, these two adjustments will create actual shaped croissants. These hiccups still don’t change how delicious this was to eat.
Hi Ray, Thank you for leaving your comments on this recipe. I will add a note to this recipe to check rising times, as all sourdoughs are not created equally. Good points. Thank you again for sharing.
Love this recipe! Would this work well to skip the chocolate for a plain croissant?
Hi Meagan, Thank you for leaving a comment. I’m glad that you have enjoyed the chocolate croissants. YES, you may opt to leave out the chocolate for a very delicious plain croissant! Enjoy!
Do you think I could refrigerate the prepped croissants overnight and then take them out to proof on the counter while I am at work and then bake when I get home in the evening? I’m making these for my sister-in-law’s birthday party on Saturday, but I’m having trouble figuring out how to time all of that out when my day off is a Thursday and I work on the following Friday. I’m trying to make them be as fresh as possible.
Hi Kati, Thank you for this question. It depends on a few factors. What time do you get off work on Friday and what time is the party on Saturday? These croissants are their very best if you can serve them soon after baking, so I am hesitant to recommend baking them the night before. Depending on the timing of all of this, I would either stop at step #15 and just refrigerate the dough until you get off work on Friday, (but your schedule may not allow enough time for this option). OR, go ahead and form the croissants Thursday night and refrigerate until after work on Friday and then go through the rising process. (I’m not sure how much they will rise in the fridge, so there is a bit of guesswork here.) I am interested in knowing how it turns out. If possible, it might be good to try it out ahead of time–more croissants for you!
I just tried this recipe out, however the bottoms of my croissants turned out super burned because there was butter sitting all throughout the pan. Do you know why this happened? How did you avoid melting butter? I only baked them for 15 minutes at 400 because of the burning.
Hi Ashley, Yes, they are made with lots of butter, so they will “leak” while baking. I suggest using a silicone baking mat on your pans to keep the croissants from burning. That’s what I do and while they have butter on the bottom, they do not burn. Please see pictures in the recipe post for meaning.